Monday, February 15, 2010
Fujifilm's new baby. GF670
This is why I love Fujifilm. This is Fujifilm's new FILM camera, the GF670. The medium format camera is obviously a folding model, and is aimed at professional photographers. Fujifilm plans to release it at PMA this year.
Two thumbs up for Fujifilm for going against the "grain". This is a great pillar for holding film up as still being available in the near future. Its wonderful that a MAJOR player in the photo industry is still manufacturing and developing film, but is also making NEW film cameras for PROFESSIONALS. This camera isn't some Polaroid replacement for the hipster masses, although Fuji does have one of those (which is cool in and of itself), but this is a brand new classic style film camera aimed at working professionals. If this isn't a bold statement about how film still has a role in the professional workplace, I don't know what is. Fujifilm has also been taking out whole page adds in high end photography magazines advertising film and posing the question, "In a digital age, is it possible to have a renaissance in film?". Fujifilm certainly thinks so, and I'm one hundred percent behind them.
Sunday, January 24, 2010
More Home Studio Tips- Black Background
Yes, I believe this is going to be the second of several home studio posts.
When I first started, I saw all of these great studio photographs that I wanted to imitate, but I really had no idea how to do it. I had to play a while before I really understood how to efficiently achieve a completely black background without underexposing. Sure, anyone can take a picture of anything and Photoshop a black completely around it, and I guess there's nothing wrong with that, but getting it right or at least MOSTLY right in camera will look MUCH better than the 'shopped version, guaranteed. So, here are a few simple steps to achieve what looks to be difficult.
Obviously, the first thing you need is space. There isn't an end all be all space requirement, but you need enough to be able to place your subject as far away from the black background as possible. Some people may need more space than others depending on what they intend to be photographing. Lets just say that putting this in a walk in closet would be a bit difficult unless your photographing watches or other small objects.
After space, the next logical step would be a black fabric to photograph. Professional grade backdrops can be quite expensive because they are made of a special material that is essentially a black hole. Black felt or muslin is probably just as good, and its cheap. Again, the amount of fabric you need depends on what you're photographing. If you're shooting small objects, then you probably only need a couple yards. If you're photographing people, then you would need a lot more fabric. Ideally, when the fabric is on the wall, it needs to be about 7.5 ft tall to accommodate for a taller individual and so that it leaves a little headroom. In addition, it needs to come out from the wall on the floor so if you want to do a full-length shot there isn't an abrupt background change at the subject's feet. Now, if you're only planning on doing headshots you don't need this much, but, again, its not expensive.
Mounting the fabric can be done in several different ways. The way that I've always done it is simply tack it to the wall. Not hard. If you don't want to do that, you can build a background stand out of PVC pipe. You can get that for cheap at your local hardware store.
When shooting, place the subject as far in front of the background as practically possible. Reason being, you want as little light as possible hitting the background. Yes its felt and yes its black but it is a physical object and it will reflect light. You can shoot the subject close to the background if you want, but that does come with some lighting limitations, so usually its just easier to move away.
You can do all this, or simply buy a simple setup like this one. This is actually a really good deal, but doing it yourself is even less expensive.
Next up... Completely white background!
When I first started, I saw all of these great studio photographs that I wanted to imitate, but I really had no idea how to do it. I had to play a while before I really understood how to efficiently achieve a completely black background without underexposing. Sure, anyone can take a picture of anything and Photoshop a black completely around it, and I guess there's nothing wrong with that, but getting it right or at least MOSTLY right in camera will look MUCH better than the 'shopped version, guaranteed. So, here are a few simple steps to achieve what looks to be difficult.
Obviously, the first thing you need is space. There isn't an end all be all space requirement, but you need enough to be able to place your subject as far away from the black background as possible. Some people may need more space than others depending on what they intend to be photographing. Lets just say that putting this in a walk in closet would be a bit difficult unless your photographing watches or other small objects.
After space, the next logical step would be a black fabric to photograph. Professional grade backdrops can be quite expensive because they are made of a special material that is essentially a black hole. Black felt or muslin is probably just as good, and its cheap. Again, the amount of fabric you need depends on what you're photographing. If you're shooting small objects, then you probably only need a couple yards. If you're photographing people, then you would need a lot more fabric. Ideally, when the fabric is on the wall, it needs to be about 7.5 ft tall to accommodate for a taller individual and so that it leaves a little headroom. In addition, it needs to come out from the wall on the floor so if you want to do a full-length shot there isn't an abrupt background change at the subject's feet. Now, if you're only planning on doing headshots you don't need this much, but, again, its not expensive.
Mounting the fabric can be done in several different ways. The way that I've always done it is simply tack it to the wall. Not hard. If you don't want to do that, you can build a background stand out of PVC pipe. You can get that for cheap at your local hardware store.
When shooting, place the subject as far in front of the background as practically possible. Reason being, you want as little light as possible hitting the background. Yes its felt and yes its black but it is a physical object and it will reflect light. You can shoot the subject close to the background if you want, but that does come with some lighting limitations, so usually its just easier to move away.
You can do all this, or simply buy a simple setup like this one. This is actually a really good deal, but doing it yourself is even less expensive.
Next up... Completely white background!
Monday, January 11, 2010
After a short hiatus I am back in business. Classes have started and I'm getting into the swing of things. This quarter I'm taking Color Technique, Shakespeare, and Survey of Computer Arts Applications.
And now, on to the post!
My Fiance has decided to try her hand at photography, and is very interested in studio lighting. Usually, when people hear the words "studio lighting" they start to shake their heads because they know that the equipment used is so expensive. Well, they're right, but it doesn't HAVE to be. I'm sure many of you have heard of Strobist. For those of you that haven't, Strobist is a blog that is dedicated to wireless off camera flash photography. The people that subscribe to this blog and utilize such equipment call themselves "Strobists". Generally, the Strobist starter kits, which can be found at a great online store called Midwest Photo Exchange are fantastic multi purpose systems, and will work with most any camera with a hotshoe. The starter kits include 1 Lumopro LP120 flash, an air cushioned light stand, umbrella, wireless radio trigger system, and a gaggle of other goodies that will help along the way. This is a GREAT way to get started using off camera lighting and is relatively inexpensive at around $200.00.
BUT, neither my Fiance nor I wanted to spend that money so early on in the game, so we decided to go a different route and use hotlights. Hotlights are so named because of the amount of heat they emit when left on for an extended period of time. These can be lamps or clip lights, or anything of that persuasion. Cliplights are great because they can be mounted almost anywhere, and are ideal for things like hairlights. Hotlights are a great alternative to flashes because they are much MUCH less expensive, they are quite versatile, and chances are there are several usable ones already in your home!
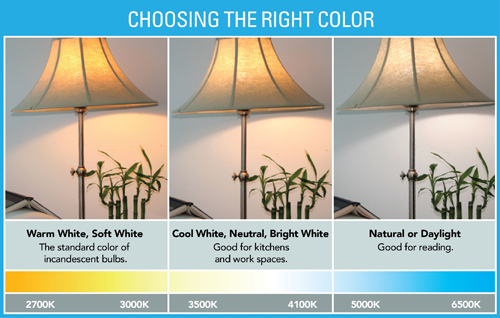
Because we didn't have many already, and we wanted to have a lot of options, Tiffany set out to Walmart to find a few utility cliplights and bulbs for those lights. The bulbs are immensely important because the temperature of the light will change dramatically depending on the bulb you buy. A standard Tungsten bulb will emit a very orange light, while an LED bulb (looks like alien technology) will emit a very cool (temperature) white light. These can be used independently from one another or in unison to create some very interesting results.
This brings me to the original purpose of this post. I am a TWIP (This Week In Photography) listener, and on one of the shows I heard mention of a homemade LED light panel. Apparently, LED based continuous light is increasing in popularity due to the amount of light emitted, and the power saving efficiency of the bulbs, which makes these systems also ideal for video use. As of right now, professional LED light systems are quite expensive, but are coming down in price quite quickly. Even so, making a homemade light panel will cost pennies compared to the real thing, and they can change your lighting in an instant. The best part is that its mind numbingly easy.
Here's what you need
-2 large, white, foam core presentation boards
-2 or more strands of LED Christmas lights
-1 roll of Duct Tape
-1 screw driver
The first step is to poke holes through one of the boards with the screwdriver. They don't have to be perfect, so long as the led bulb can be pushed through. The most efficient arrangement is in rows, but there's nothing wrong with getting creative. After all of the holes are punched, simply push the led bulbs through the holes. After that's finished, its a good idea to make sides for your panel so the light is being led in one direction instead of being lost out to the sides. This is where the duct tape comes in. Cut the other board in to long pieces and tape them to the edges of the light panel so that they are protruding in the same direction as the bulbs are facing.
The finished product should look something like this.


Putting tin foil on the sides helps to reflect light with greater efficiency.
Here is an example image taken with the panel. The panel was on a painting easel camera right with a reflector behind the pineapple camera left.

And there you have the homemade light panel. I think there will be more posts to come about home studios...
I also may upload a video in a few days to demonstrate.
And now, on to the post!
My Fiance has decided to try her hand at photography, and is very interested in studio lighting. Usually, when people hear the words "studio lighting" they start to shake their heads because they know that the equipment used is so expensive. Well, they're right, but it doesn't HAVE to be. I'm sure many of you have heard of Strobist. For those of you that haven't, Strobist is a blog that is dedicated to wireless off camera flash photography. The people that subscribe to this blog and utilize such equipment call themselves "Strobists". Generally, the Strobist starter kits, which can be found at a great online store called Midwest Photo Exchange are fantastic multi purpose systems, and will work with most any camera with a hotshoe. The starter kits include 1 Lumopro LP120 flash, an air cushioned light stand, umbrella, wireless radio trigger system, and a gaggle of other goodies that will help along the way. This is a GREAT way to get started using off camera lighting and is relatively inexpensive at around $200.00.
BUT, neither my Fiance nor I wanted to spend that money so early on in the game, so we decided to go a different route and use hotlights. Hotlights are so named because of the amount of heat they emit when left on for an extended period of time. These can be lamps or clip lights, or anything of that persuasion. Cliplights are great because they can be mounted almost anywhere, and are ideal for things like hairlights. Hotlights are a great alternative to flashes because they are much MUCH less expensive, they are quite versatile, and chances are there are several usable ones already in your home!
Because we didn't have many already, and we wanted to have a lot of options, Tiffany set out to Walmart to find a few utility cliplights and bulbs for those lights. The bulbs are immensely important because the temperature of the light will change dramatically depending on the bulb you buy. A standard Tungsten bulb will emit a very orange light, while an LED bulb (looks like alien technology) will emit a very cool (temperature) white light. These can be used independently from one another or in unison to create some very interesting results.
This brings me to the original purpose of this post. I am a TWIP (This Week In Photography) listener, and on one of the shows I heard mention of a homemade LED light panel. Apparently, LED based continuous light is increasing in popularity due to the amount of light emitted, and the power saving efficiency of the bulbs, which makes these systems also ideal for video use. As of right now, professional LED light systems are quite expensive, but are coming down in price quite quickly. Even so, making a homemade light panel will cost pennies compared to the real thing, and they can change your lighting in an instant. The best part is that its mind numbingly easy.
Here's what you need
-2 large, white, foam core presentation boards
-2 or more strands of LED Christmas lights
-1 roll of Duct Tape
-1 screw driver
The first step is to poke holes through one of the boards with the screwdriver. They don't have to be perfect, so long as the led bulb can be pushed through. The most efficient arrangement is in rows, but there's nothing wrong with getting creative. After all of the holes are punched, simply push the led bulbs through the holes. After that's finished, its a good idea to make sides for your panel so the light is being led in one direction instead of being lost out to the sides. This is where the duct tape comes in. Cut the other board in to long pieces and tape them to the edges of the light panel so that they are protruding in the same direction as the bulbs are facing.
The finished product should look something like this.
Putting tin foil on the sides helps to reflect light with greater efficiency.
Here is an example image taken with the panel. The panel was on a painting easel camera right with a reflector behind the pineapple camera left.
And there you have the homemade light panel. I think there will be more posts to come about home studios...
I also may upload a video in a few days to demonstrate.
Sunday, January 10, 2010
Monday, January 4, 2010
A little lax at the moment
Happy New Year everyone!
So I haven't posted in a while, what with the holidays and spending time with the fam. I've got a couple posts in the works, but it will be a day or two before I am able to finalize them because classes have started.
In the meantime, I have started the 365 project and am on day 4 (started Jan1). You can find them on flickr here http://www.flickr.com/photos/nach0o/
or on the actual 365 website here http://365project.org/nacho/365
Until next time.
So I haven't posted in a while, what with the holidays and spending time with the fam. I've got a couple posts in the works, but it will be a day or two before I am able to finalize them because classes have started.
In the meantime, I have started the 365 project and am on day 4 (started Jan1). You can find them on flickr here http://www.flickr.com/photos/nach0o/
or on the actual 365 website here http://365project.org/nacho/365
Until next time.
Wednesday, December 30, 2009
Home Cookin'
You know how home made meals are usually better than the same meals at a restaurant? One of the reasons why home made meals are better is they are generally a LOT less expensive if not free.
The same applies to home-studios! You don't have to spend an arm and a leg to get some really awesome studio lighting. Obviously they're not the REAL DEAL (this is where my analogy fails), but they can be very similar and for a fraction of the cost. Pretty much everything you need can be found cheaply at Wal-Mart and/or Home Depot/Lowes.
Wednesday, December 23, 2009
Canon 7D. 21 days in. Rerereview.
I've reread my initial "review", if you can call it that, of the 7D a few times, and I've come to the conclusion that the post really didn't do justice to the camera. Note, probably no review I can provide can be fully counted on, but I feel as though maybe I should tell a little bit more than what was said in the beginning. Now that I've really had the time to shoot with the camera I can provide a more "mature" depiction of the camera, rather than the "Oh I just got it now I want to talk about it" state of mind I may have been guilty of earlier.
As stated before, the camera feels very good in hand. The body is designed quite well, and it feels snug and not as bulky as it could. The buttons on the back of the body have nothing to hide, and everything is well placed. A couple of the most useful physical features of the camera are the Quick menu and the One-touch RAW + Jpeg buttons. The quick menu is essentially what the name sounds like...its a quick menu. Press the button and you'll see your settings neatly displayed on the LCD which can be easily navigated through and changed, you guessed it, quickly. The instant RAW + Jpeg button is useful if you're shooting Jpegs just for the fun of it, and then you see something really cool so you need to quickly record a RAW image as well. I do not find much use for this feature, however, considering I shoot entirely in RAW. I would also imagine that most people using the 7D would be doing likewise. Of course the feature works both ways, so If you're shooting RAW and you also want to record a Jpeg you can do that as well, but I can't really think of a practical application where you would be unable to make a jpeg from the RAW image later... Lets not go there.
Also as as stated previously, the menu controls are logical, but some features can be a little buried. The 7D also has a feature which allows the photographer to write his or her copyright information into the metadata which is just super. Since I'm upgrading from the XT I'm not used to this feature and I'm so glad its there. Something else great about the menu is that you can customize pretty much every button on the back of the camera. Very very cool. I've found that having image quality assigned to the SET button in the middle of the dial is the most useful for me.
The custom functions are easily utilized, and can be very useful in the right situation . Just simply begin in manual mode, choose the functions and settings you would use to shoot in that given situation, and then assign them to C1, C2, or C3. I use C1 for standard daylight shooting, C2 for night shooting, and C3 for video.
Another great feature is the electronic level. Just hit info a couple times while your shooting and the level will come up on the LCD. You can also have it appear in the viewfinder through the activated AF points, but I haven't spent the energy to figure out how to do it. When I first read about the level, I thought it was cool, but I didn't think I would use it. Wrong. I've already used it several times in practical applications and its oh so useful, and in all my experiences, accurate.
I don't shoot a lot of fast moving subjects, but today I decided to go out and shoot my dogs just to play around with the all new AF. Love it. Its deadly. The 7D tracked my running dogs with ease, even when they were running towards me. The 8fps was also a very useful tool and a pleasure to listen to. Oh, the power. The low-light AF also greatly outperforms the XT, but I'm not too sure how it racks up against direct competitors. Again, the 100% viewfinder is a blessing.
I've looked at the noise on the 7D SEVERAL times. Yes, I've been pixel peeping. What I've found is that the noise at high ISOs isn't as bad as I thought it was. I was actually just looking at a few JPEGS I took indoors in low light at 5000 ISO and I found the noise levels to be surprisingly manageable. Here are a couple screenshots of an image I shot in the middle of the night at 4000 iso. The Raw files were opened in DPP and then brought into Lightroom as Tiffs. NR tools were used in both programs. Taken with a Canon 50mm 1.8 II at 1.8 for 1/40 sec at ISO 4000. The second image is at 100%.

Another point of interest is the apparent softness in the images viewed on the LCD screen. To some people, like me, this may cause some stress early on in the game. Its important to remember, however, that we're dealing with 18 megapixels, the image we're viewing on the LCD is a Jpeg rendition (even in RAW), and that every sensor depicts a RAW file differently, and that each RAW file put out any given camera needs a given amount of editing.
As far as video goes, I'm not going to pretend like I know stuff, 'cause I don't. After doing some research I've realized that in order to really fully get into video one has to invest in a plethora of other expensive gear that I'm just not ready to commit to by any stretch of the imagination. I'll dabble with what I've got and edit with iMovie. You can find a lot of other reviews raving about the 7Ds video capabilities.
A feature that I'm excited about, but haven't been able to test yet, is the ability to trigger multiple speedlights via the pop up flash. I haven't been able to play yet because as of right now I don't have any speedlights. Maybe soon? Should be very useful.
And I guess that'll wrap up my 3rd edition of the Canon 7D "review". Thanks for reading. Here are some sample photos taken with a similar workflow as mentioned above.
As stated before, the camera feels very good in hand. The body is designed quite well, and it feels snug and not as bulky as it could. The buttons on the back of the body have nothing to hide, and everything is well placed. A couple of the most useful physical features of the camera are the Quick menu and the One-touch RAW + Jpeg buttons. The quick menu is essentially what the name sounds like...its a quick menu. Press the button and you'll see your settings neatly displayed on the LCD which can be easily navigated through and changed, you guessed it, quickly. The instant RAW + Jpeg button is useful if you're shooting Jpegs just for the fun of it, and then you see something really cool so you need to quickly record a RAW image as well. I do not find much use for this feature, however, considering I shoot entirely in RAW. I would also imagine that most people using the 7D would be doing likewise. Of course the feature works both ways, so If you're shooting RAW and you also want to record a Jpeg you can do that as well, but I can't really think of a practical application where you would be unable to make a jpeg from the RAW image later... Lets not go there.
Also as as stated previously, the menu controls are logical, but some features can be a little buried. The 7D also has a feature which allows the photographer to write his or her copyright information into the metadata which is just super. Since I'm upgrading from the XT I'm not used to this feature and I'm so glad its there. Something else great about the menu is that you can customize pretty much every button on the back of the camera. Very very cool. I've found that having image quality assigned to the SET button in the middle of the dial is the most useful for me.
The custom functions are easily utilized, and can be very useful in the right situation . Just simply begin in manual mode, choose the functions and settings you would use to shoot in that given situation, and then assign them to C1, C2, or C3. I use C1 for standard daylight shooting, C2 for night shooting, and C3 for video.
Another great feature is the electronic level. Just hit info a couple times while your shooting and the level will come up on the LCD. You can also have it appear in the viewfinder through the activated AF points, but I haven't spent the energy to figure out how to do it. When I first read about the level, I thought it was cool, but I didn't think I would use it. Wrong. I've already used it several times in practical applications and its oh so useful, and in all my experiences, accurate.
I don't shoot a lot of fast moving subjects, but today I decided to go out and shoot my dogs just to play around with the all new AF. Love it. Its deadly. The 7D tracked my running dogs with ease, even when they were running towards me. The 8fps was also a very useful tool and a pleasure to listen to. Oh, the power. The low-light AF also greatly outperforms the XT, but I'm not too sure how it racks up against direct competitors. Again, the 100% viewfinder is a blessing.
I've looked at the noise on the 7D SEVERAL times. Yes, I've been pixel peeping. What I've found is that the noise at high ISOs isn't as bad as I thought it was. I was actually just looking at a few JPEGS I took indoors in low light at 5000 ISO and I found the noise levels to be surprisingly manageable. Here are a couple screenshots of an image I shot in the middle of the night at 4000 iso. The Raw files were opened in DPP and then brought into Lightroom as Tiffs. NR tools were used in both programs. Taken with a Canon 50mm 1.8 II at 1.8 for 1/40 sec at ISO 4000. The second image is at 100%.
Another point of interest is the apparent softness in the images viewed on the LCD screen. To some people, like me, this may cause some stress early on in the game. Its important to remember, however, that we're dealing with 18 megapixels, the image we're viewing on the LCD is a Jpeg rendition (even in RAW), and that every sensor depicts a RAW file differently, and that each RAW file put out any given camera needs a given amount of editing.
As far as video goes, I'm not going to pretend like I know stuff, 'cause I don't. After doing some research I've realized that in order to really fully get into video one has to invest in a plethora of other expensive gear that I'm just not ready to commit to by any stretch of the imagination. I'll dabble with what I've got and edit with iMovie. You can find a lot of other reviews raving about the 7Ds video capabilities.
A feature that I'm excited about, but haven't been able to test yet, is the ability to trigger multiple speedlights via the pop up flash. I haven't been able to play yet because as of right now I don't have any speedlights. Maybe soon? Should be very useful.
And I guess that'll wrap up my 3rd edition of the Canon 7D "review". Thanks for reading. Here are some sample photos taken with a similar workflow as mentioned above.
Subscribe to:
Posts (Atom)